ROV Integration Documentation
ROV is an integration for the FieldTwin platform that allows account administrators to upload and process the data captured by the remotely operated vehicles (ROVs) used for the critical inspection and maintenance of underwater assets, encompassing pipelines, wells, and other equipment.
The processed data can be accessed through FieldTwin Design part of the integration by any user of the account. It significantly enhances their ability to monitor, analyze, and make informed decisions.
Installation
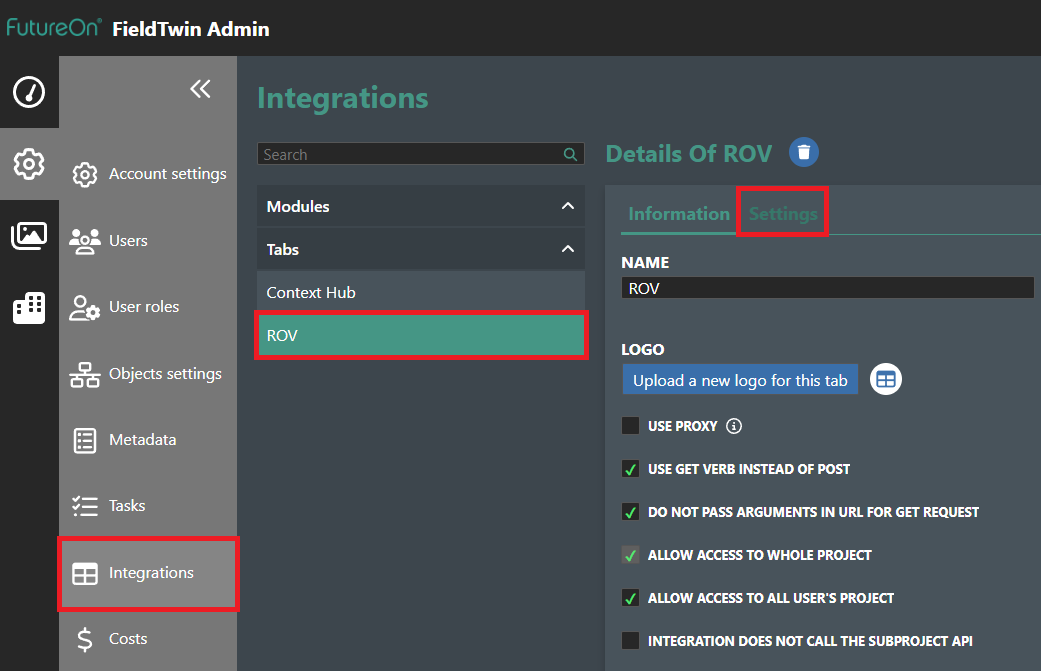
In FieldTwin Admin, go to Account Settings, then Integrations, and click Create New Tab. Set the following values:
Name:                           ROV
URL:                            https://rov-frontenduser.TBD/
Account Settings URL:           https://rov-frontendadmin.TBD/
Use GET verb:                   yes
Do not pass arguments in URL:   yes
Tab Display Position:           Module Panel (default)
Configuration
In FieldTwin Admin, go to Account Settings, then Integrations, ROV (or the name you entered in the installation above) and click Settings.
ROV Admin
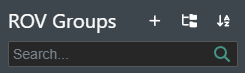
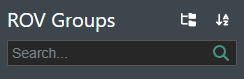
ROV Groups tree view
This is where the account administrator can create new ROV media groups or subgroups, or edit and delete existing ones.
ROV Groups tree view actions
The tree view actions can be seen here:
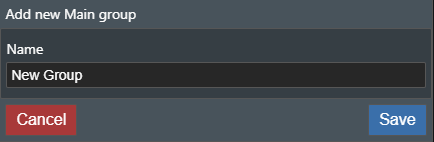
 add new main group.
 expand the main groups list when it is collapsed or collapse it when expanded.
 sort the groups alphabetically (A-Z) or (Z-A).
The search bar allows you to find any group or subgroup by its name.
When adding a new main group, a popup will appear.
Next to every group, there is a hamburger menu, where you can:
- For the main groups - add a new subgroup, rename it or delete it.
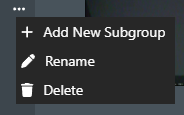
- For the subgroups: - move it to another main group, rename it or delete it.
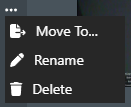
Upon selecting a main group, the options for adding a new subgroup, renaming and deleting can also be accessed by this menu above the subgroups list.

 Add new subgroup.
 Rename the main group.
 Delete the main group.
On the right side, there are options for sorting and searching the main group in order to find a specific subgroup. The default sorting is by the subgroup names (A-Z), but you can change it to one of the following options:
- Newest First
- Name (A-Z)
- Name (Z-A)
- Start date
- End date
- Vendor
You can search by any of those parameters in the search bar.

Create a new subgroup
To create a new subgroup, select the "Add New Subgroup" option from the hamburger menu or click on the
![]() icon.
A new page will load to the right side of the tree view.
icon.
A new page will load to the right side of the tree view.
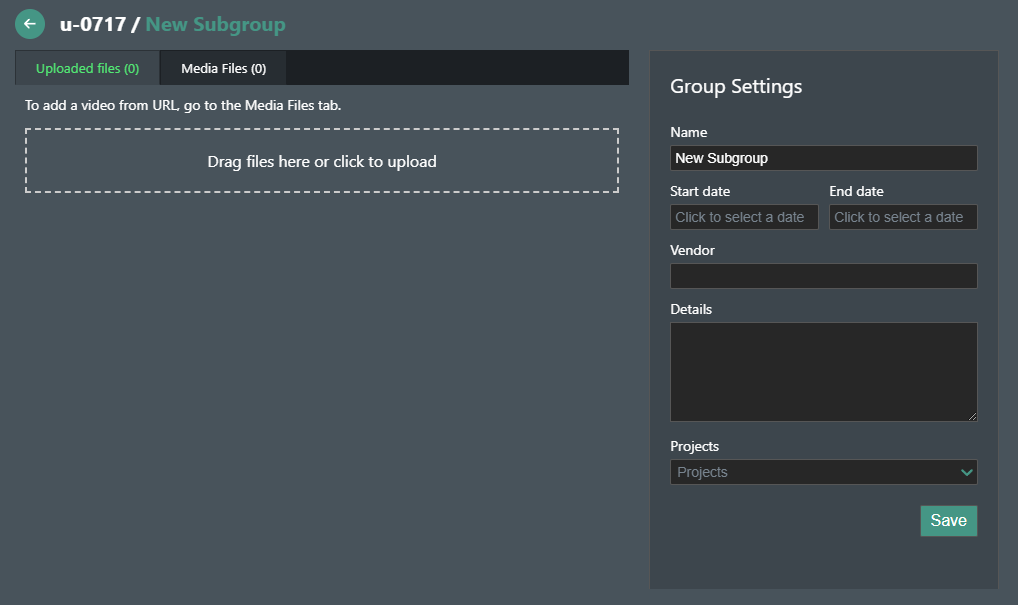
If you wish, you can change the group settings by entering:
- A new subgroup name
- Start date
- End date
- Vendor
- Details
It is necessary to link the subgroup to a project from the "Projects" dropdown, so it can appear in the FiedTwin Designer part of the integration. After entering all the information about the new subgroup, click the "Save" button to save the changes.
Next comes the data uploading part. You can either click on the file upload zone or drag and drop files to it. Currently, we support video files for the different ROV cameras and CSV files for their coordinates.
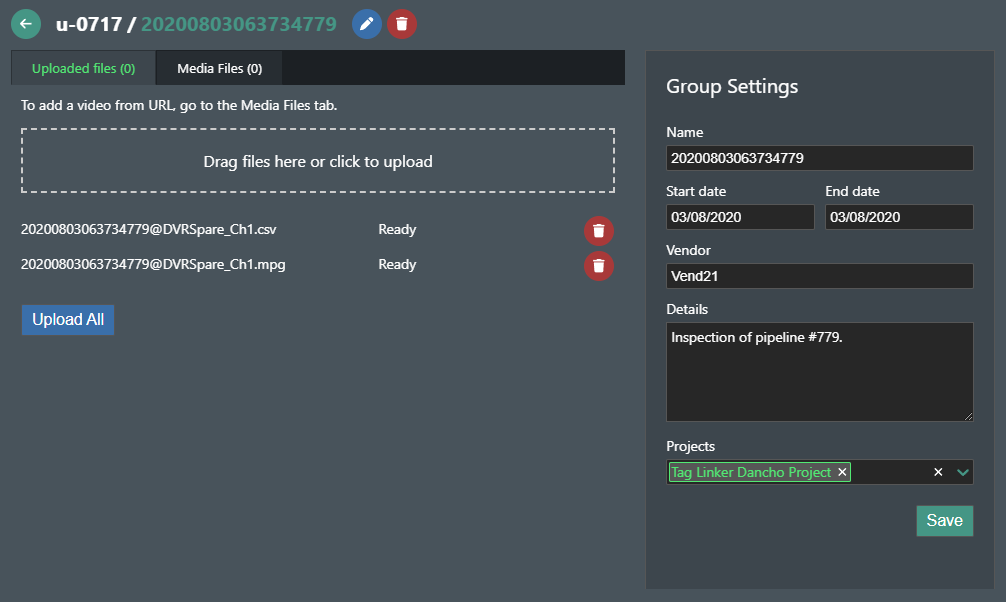
After choosing the desired video and coordinate files, click on the "Upload All" button.
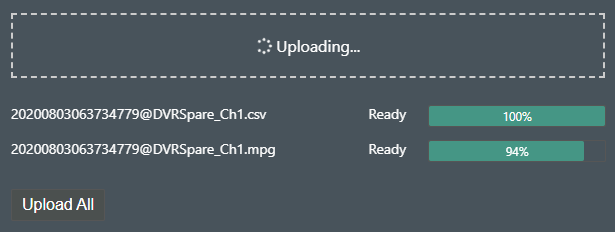
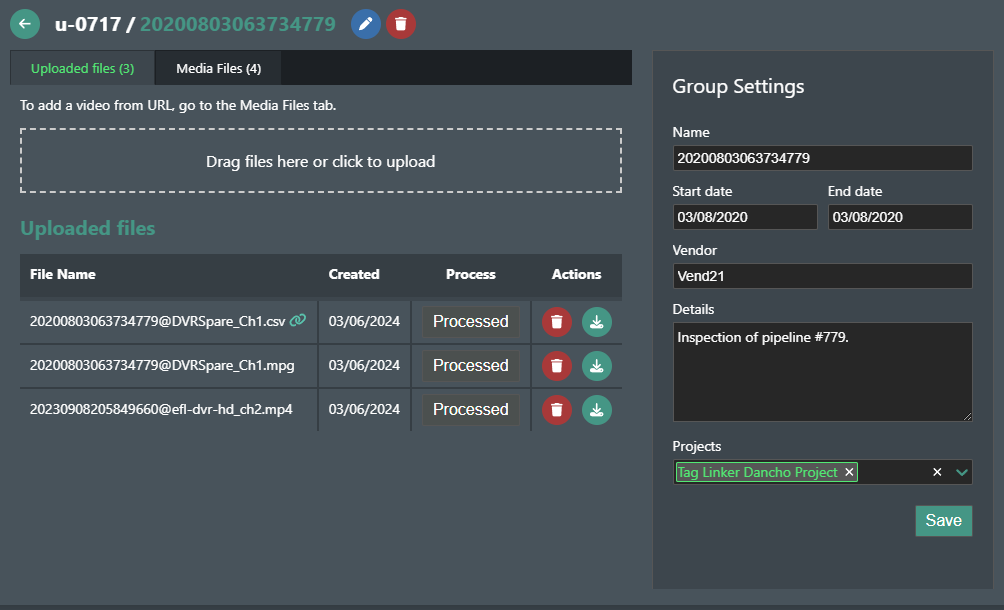
The files will be transferred to the "Uploaded files" section, where you can see their name, when they were uploaded, process them, download or delete them.

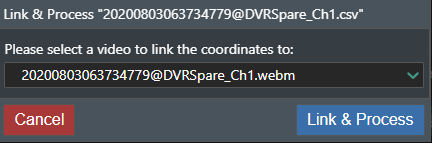
To make the uploaded files usable by the FieldTwin Designer part of the integration, you need to process the video and CSV files. First, the video files should be processed, then the CSV files should follow, linking each CSV file to an already processed video file.
Initiate by clicking the "Process" button.

After the video processing is finished, you can process the CSV file by linking it to the already processed video and clicking "Link & Process".
All processed files will appear in the "Media Files" tab, where you can see their name, type, creation date and download and delete them.
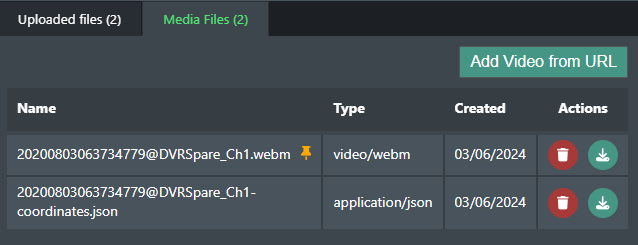
The first processed video will automatically be set as a cover, meaning that a frames from it will be used for the thumbnail of the subgroup. If you have more than one processed video, a new option would appear, allowing you to set any video as the cover.

 set video as cover.
- delete file.
 download file.
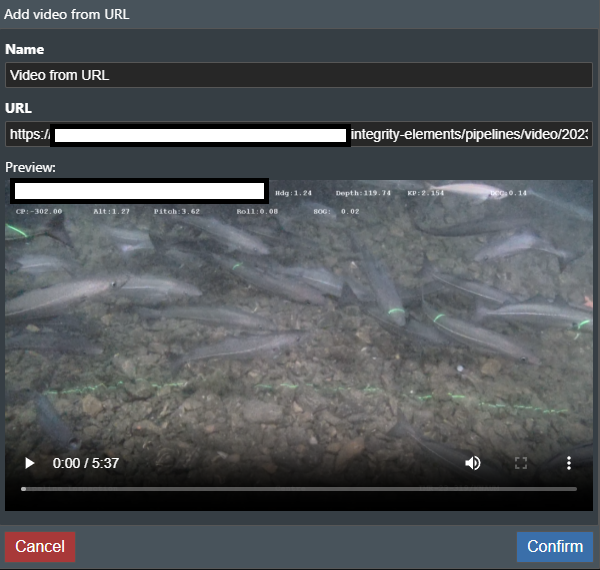
Add video from URL
In the "Media Files" tab, you can also add a video by clicking on the "Add Video from URL" button.
Enter a name and a valid URL for the video and click "Confirm"
Move a subgroup to another main group
To move a subgroup to another main group, select the "Move to..." option and choose the main group, where you want to move the current subgroup to from the dropdown input. Click "Confirm" to complete the transfer.

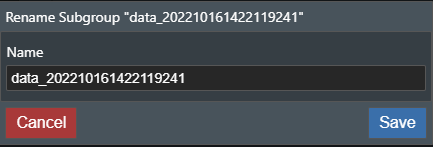
Rename a group
To rename a group, select the "Rename" option from the hamburger menu or click on the ![]() icon next to the group's name, enter the new group name and click "Confirm".
icon next to the group's name, enter the new group name and click "Confirm".
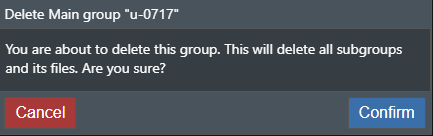
Delete a group
To delete a subgrourovp, select the "Delete" option from the hamburger menu or click on the icon next to the group's name and approve the confirmation popup.
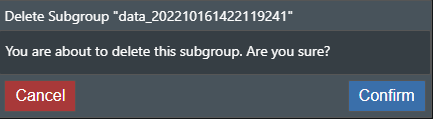
Note that deleting a main group will also delete all of the subgroups within it.
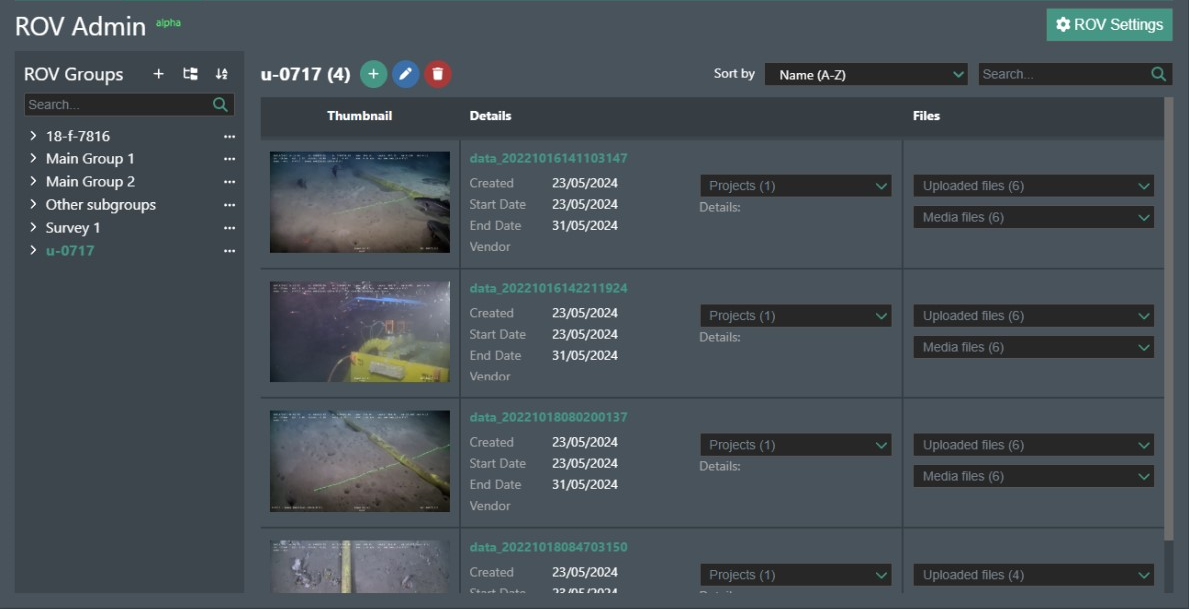
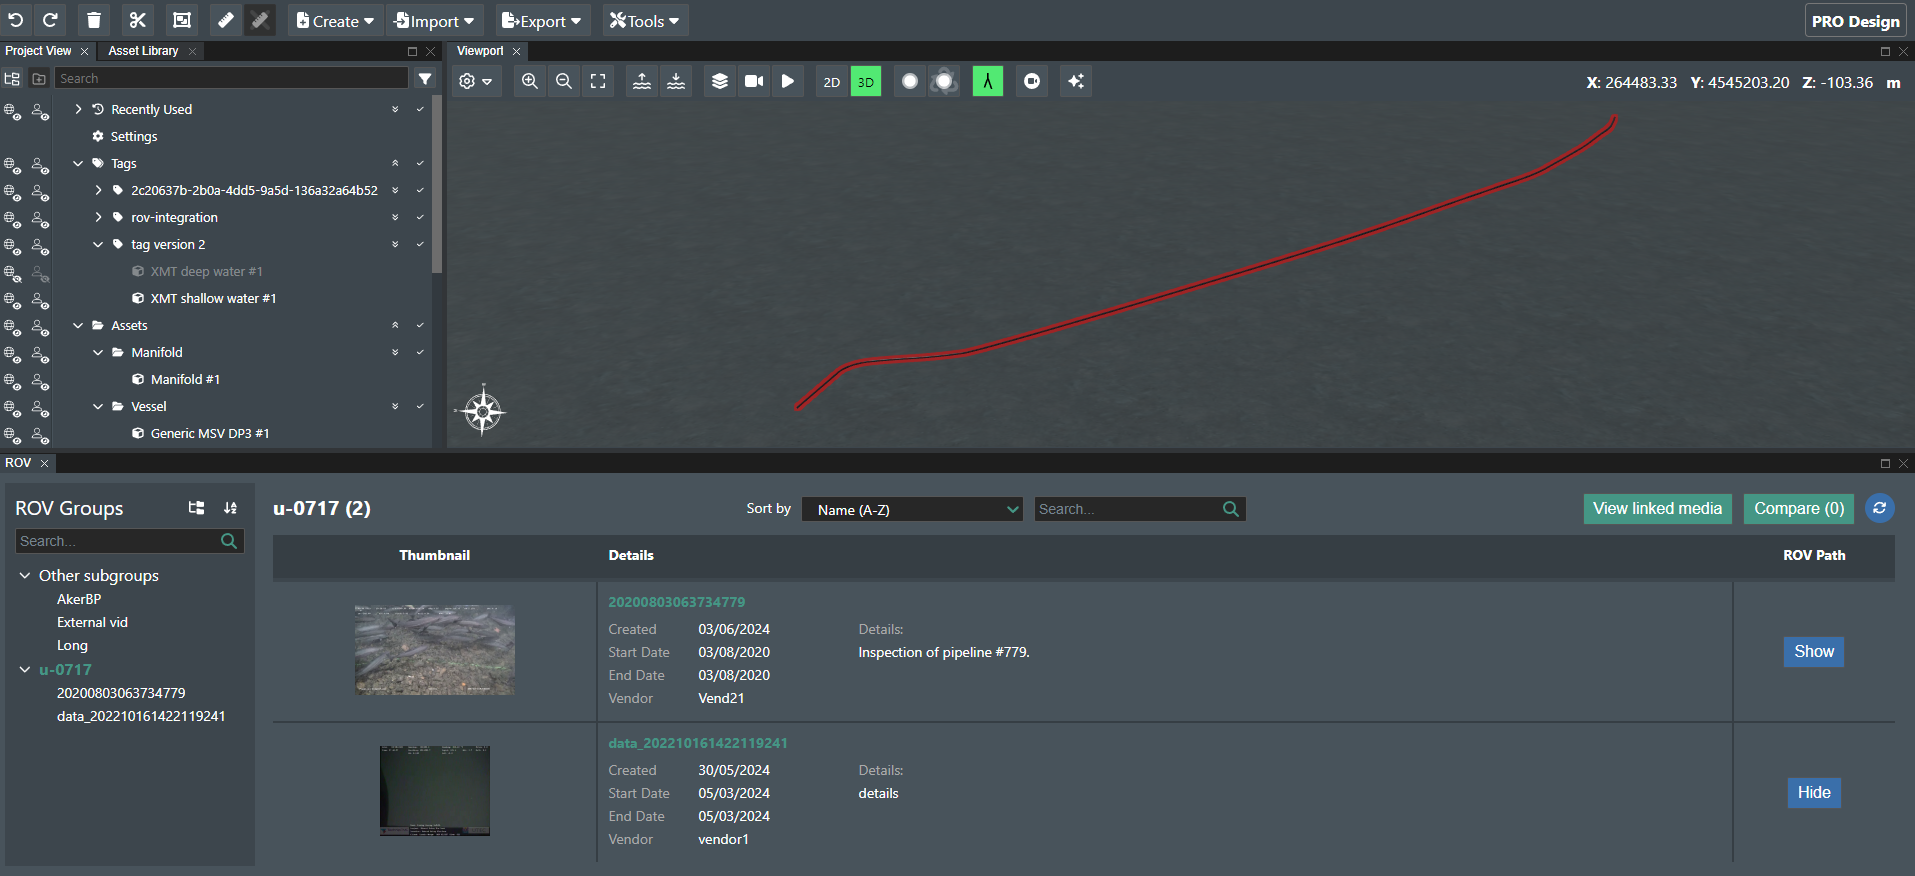
ROV Main group list of subgroups
Upon selecting a main group, a list of its contained subgroups will appear. The list of subgroups contains three columns:
- Thumbnail, which is a set of images taken when the cover video was processed.
- Details, which are filled when creating each subgroup.
- Files, which shows the uploaded and media files of the subgroup.

Clicking on the name of any subgroup will change the current view from the main group list to the currently selected subgroup's page.
You can use the ![]() icon to go back to the main group's list or click on the main group's name from the tree view.
icon to go back to the main group's list or click on the main group's name from the tree view.
ROV Admin Settings
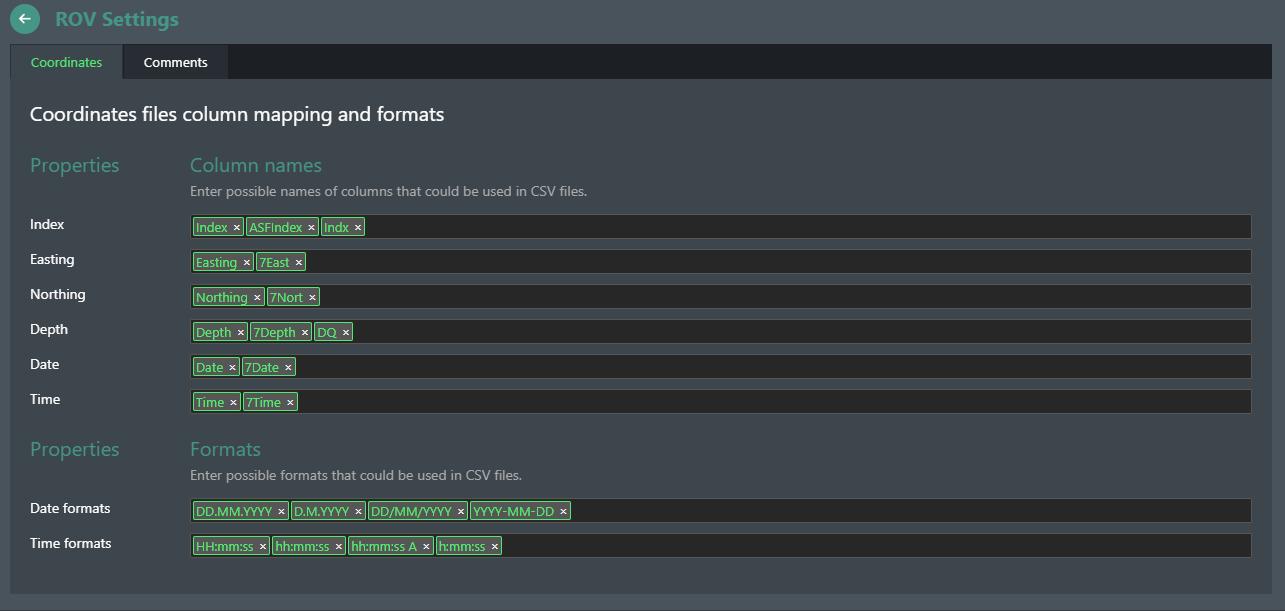
The ROV settings are mainly used to save different column mapping options for the coordinates and comments files. These are needed in order to successfully process the CSV files with coordinates or the Excel files with comments (available only through the FieldTwin Designer part of the integration).
To access the settings, click on the "ROV Settings" button.

Coordinates files column mapping and formats.
Comments files column mapping.
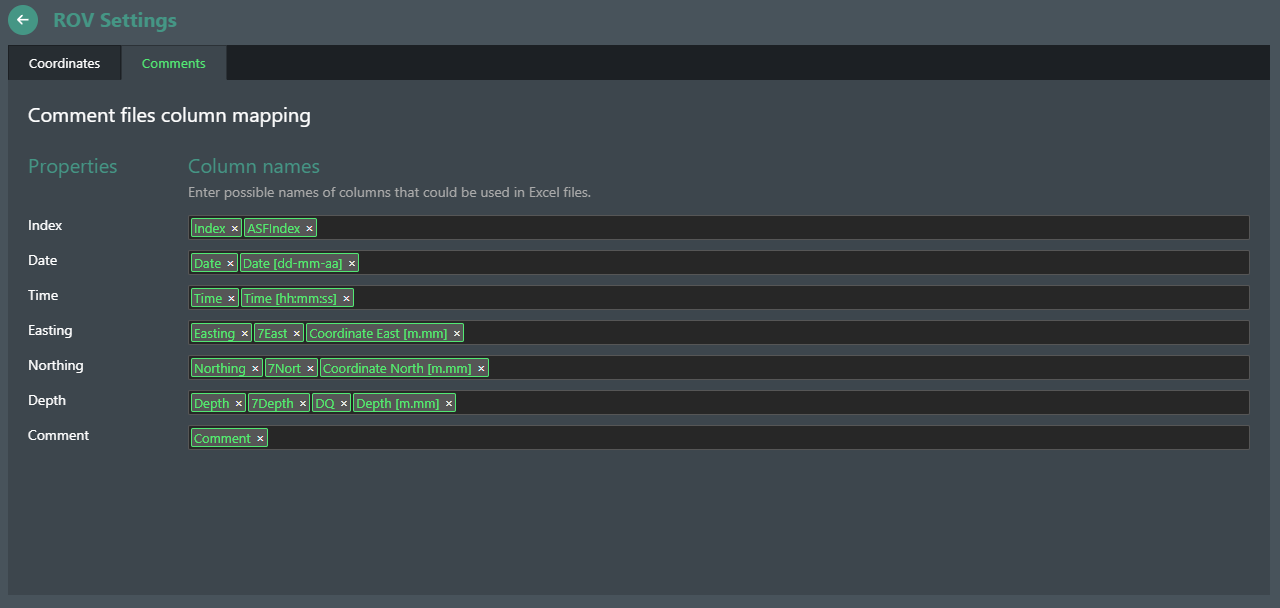
To add a new column mapping, click on the desired property field and input the new mapping. To delete an existing mapping, either click on the X next to each mapping or just backspace with the keyboard. Exiting the field saves the changes automatically.
ROV User
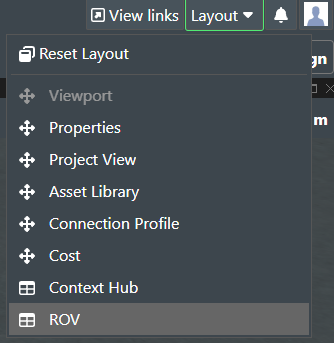
The ROV User integration can be accessed through FieldTwin Designer. To do so, click on "Layout", then "ROV" or however you have named the integration in the admin part.
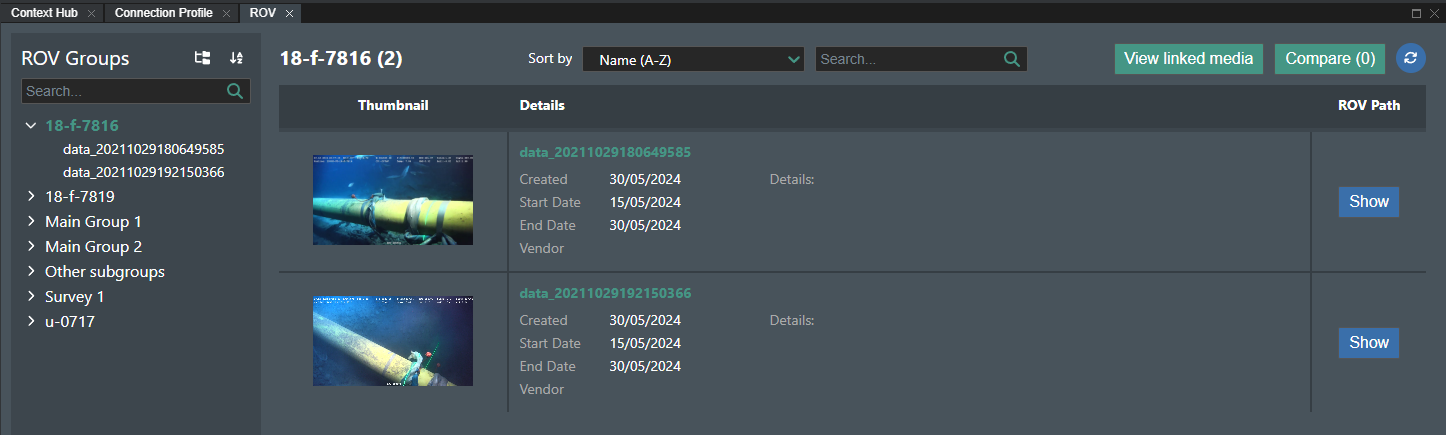
Overall view
This is how the ROV User integration looks like.
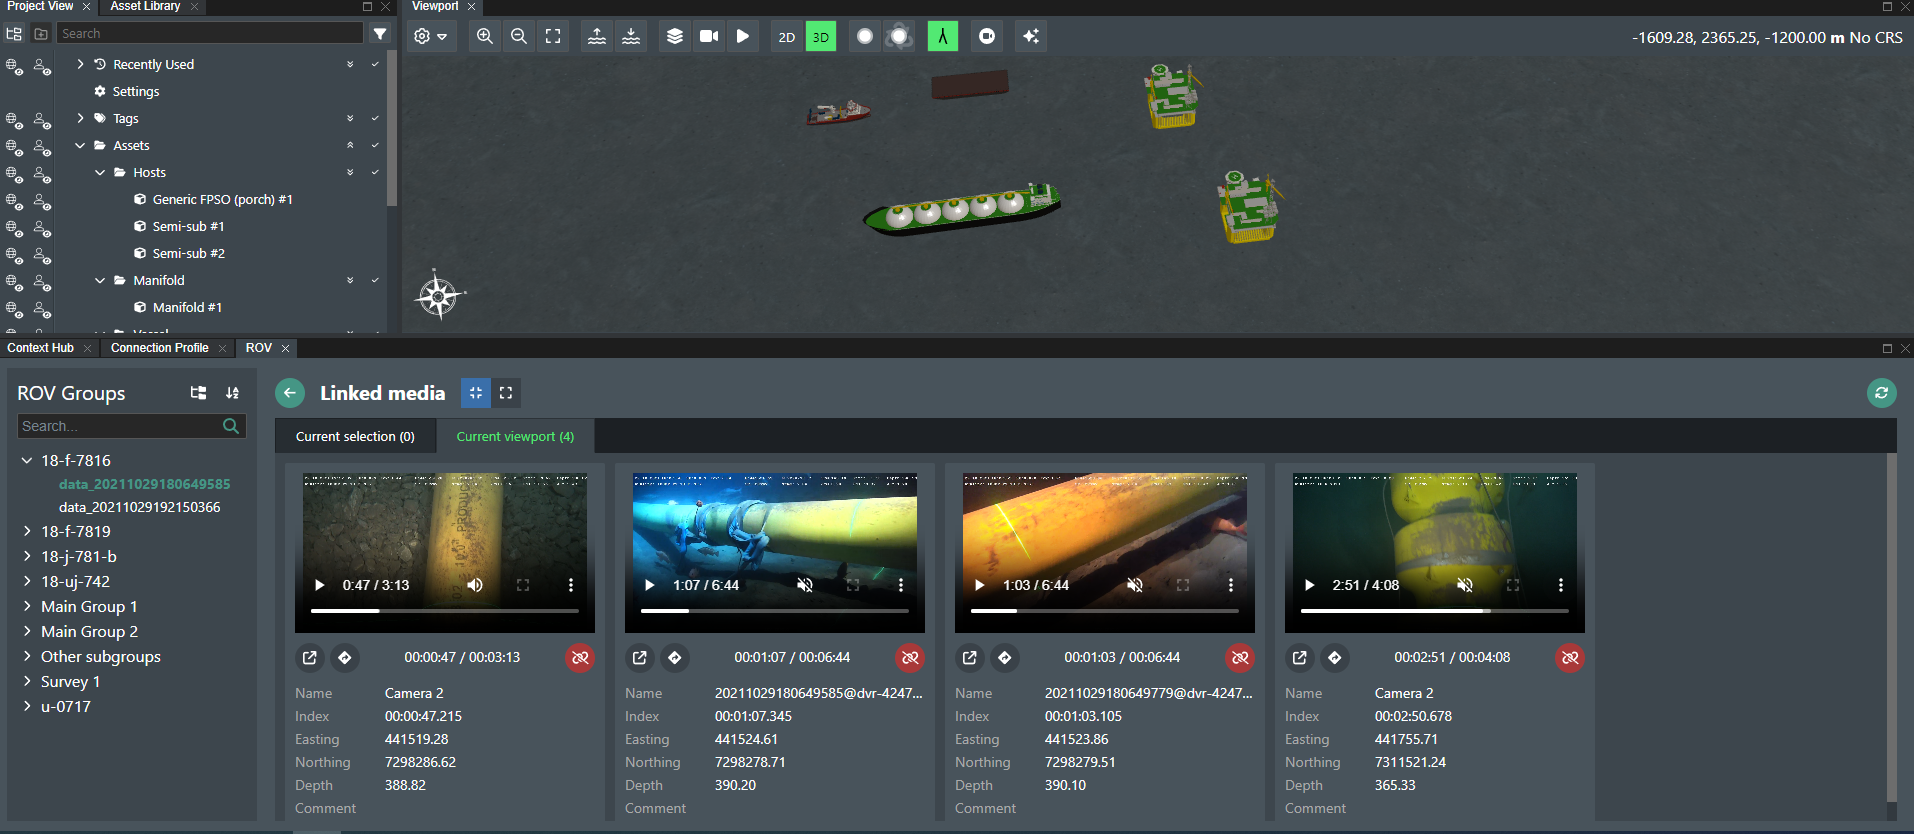
Tree view
The tree view allows you to access all available main groups and subgroups for the current project. These are the tree actions.
- expand the main groups list when it is collapsed or collapse it when expanded.
- sort the groups alphabetically (A-Z) or (Z-A).
Searching by name is available for any group within the tree.
Main groups list
Upon selecting a main group, you will see its name and the number of contained subgroups. On the middle, there are options for sorting the subgroups and searching for any of their properties.

The default sorting is by the subgroup names (A-Z), but you can change it to one of the following options:
- Newest First
- Name (A-Z)
- Name (Z-A)
- Start date
- End date
- Vendor
The subgroups are presented inside a table, each having a thumbnail from its cover video if available, details and ROV path toggling action.

The details include:
- Name of the subgroup.
- Created.
- Start Date.
- End Date.
- Vendor.
- Details.
Clicking on "Show" creates the virtual ROV path and the viewport is automatically zoomed on it.
Subgroup view
Upon opening a subgroup, this screen will open.
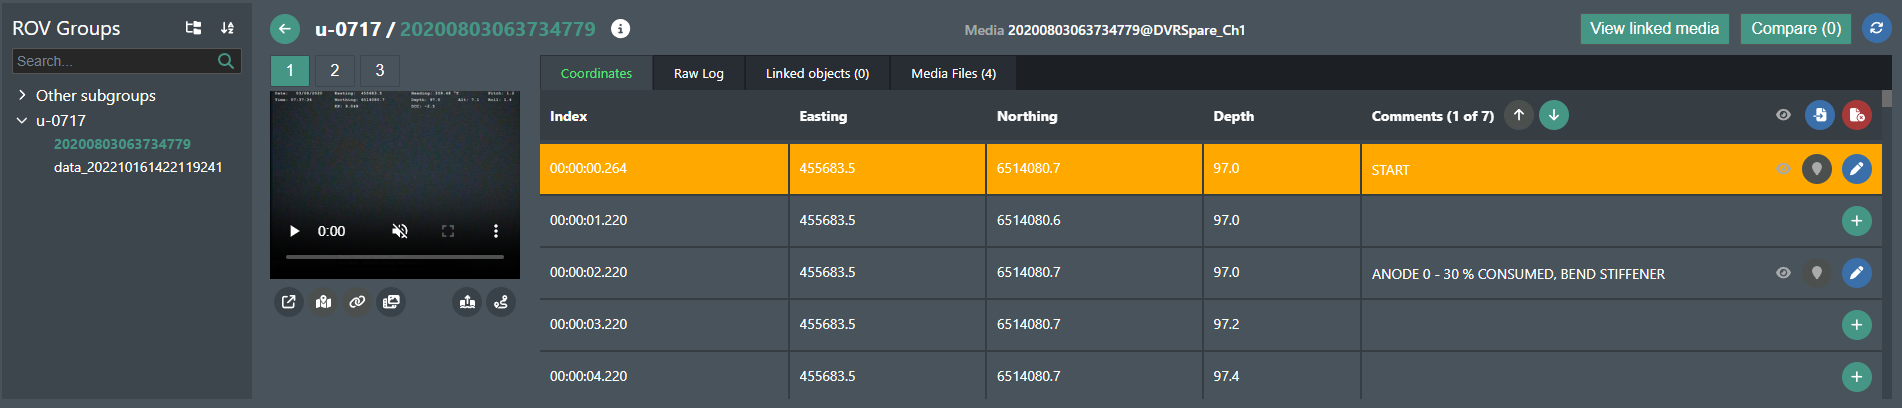
Controls
You can switch between all the processed videos within the subgroup by navigating to the desired one through this menu.
Underneath this menu is the video player. It is a default browser player, that you can use to play and pause the video or drag the slider to go to a specific time. You can also mute and unmute it, change the playback speed, download it or choose to open it in picture in picture mode.
Below the video player, you can find the custom controls menu.

 enable or disable the Picture in Picture mode.
 generate coordinates for the video by selecting a connection asset in the viewport and clicking on this icon. Note that you can only generate coordinates for a video if you haven't processed a CSV file containing the coordinates already.
 link one or many selected objects in the viewport to this video. Those objects will then appear in the "Linked objects" tab, where you can view and unlink them.
 add this video for a comparison view, that can be accessed by clicking on the "Compare" button in the top right corner.
 toggle on and off the virtual ROV asset.
 toggle on and off the virtual ROV path.
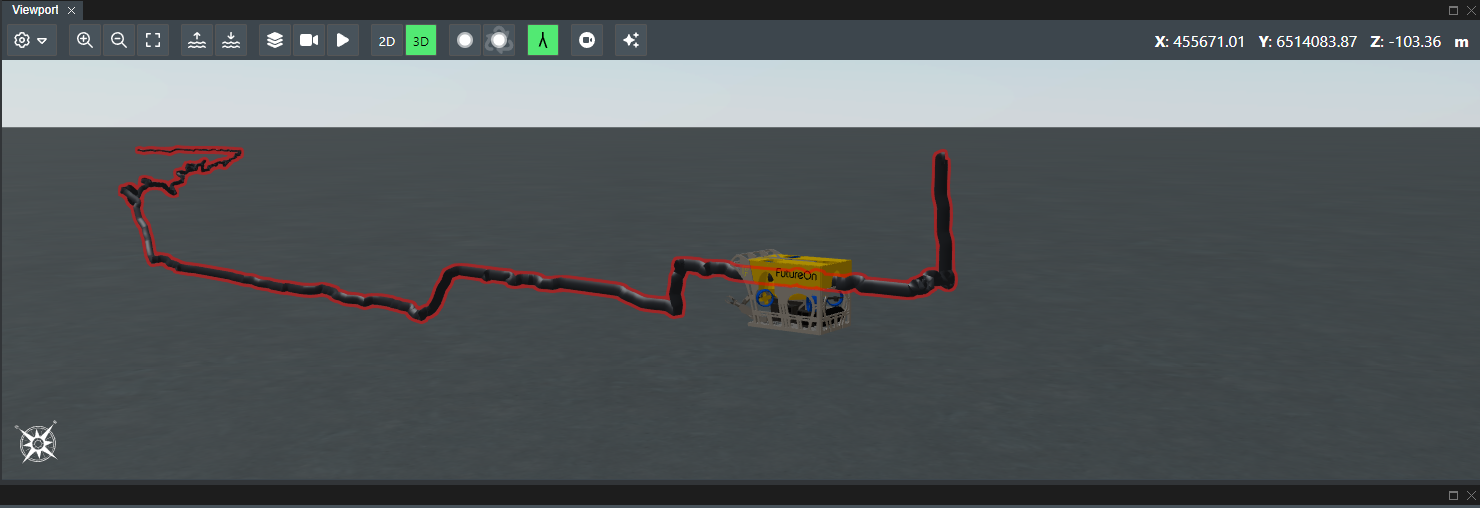
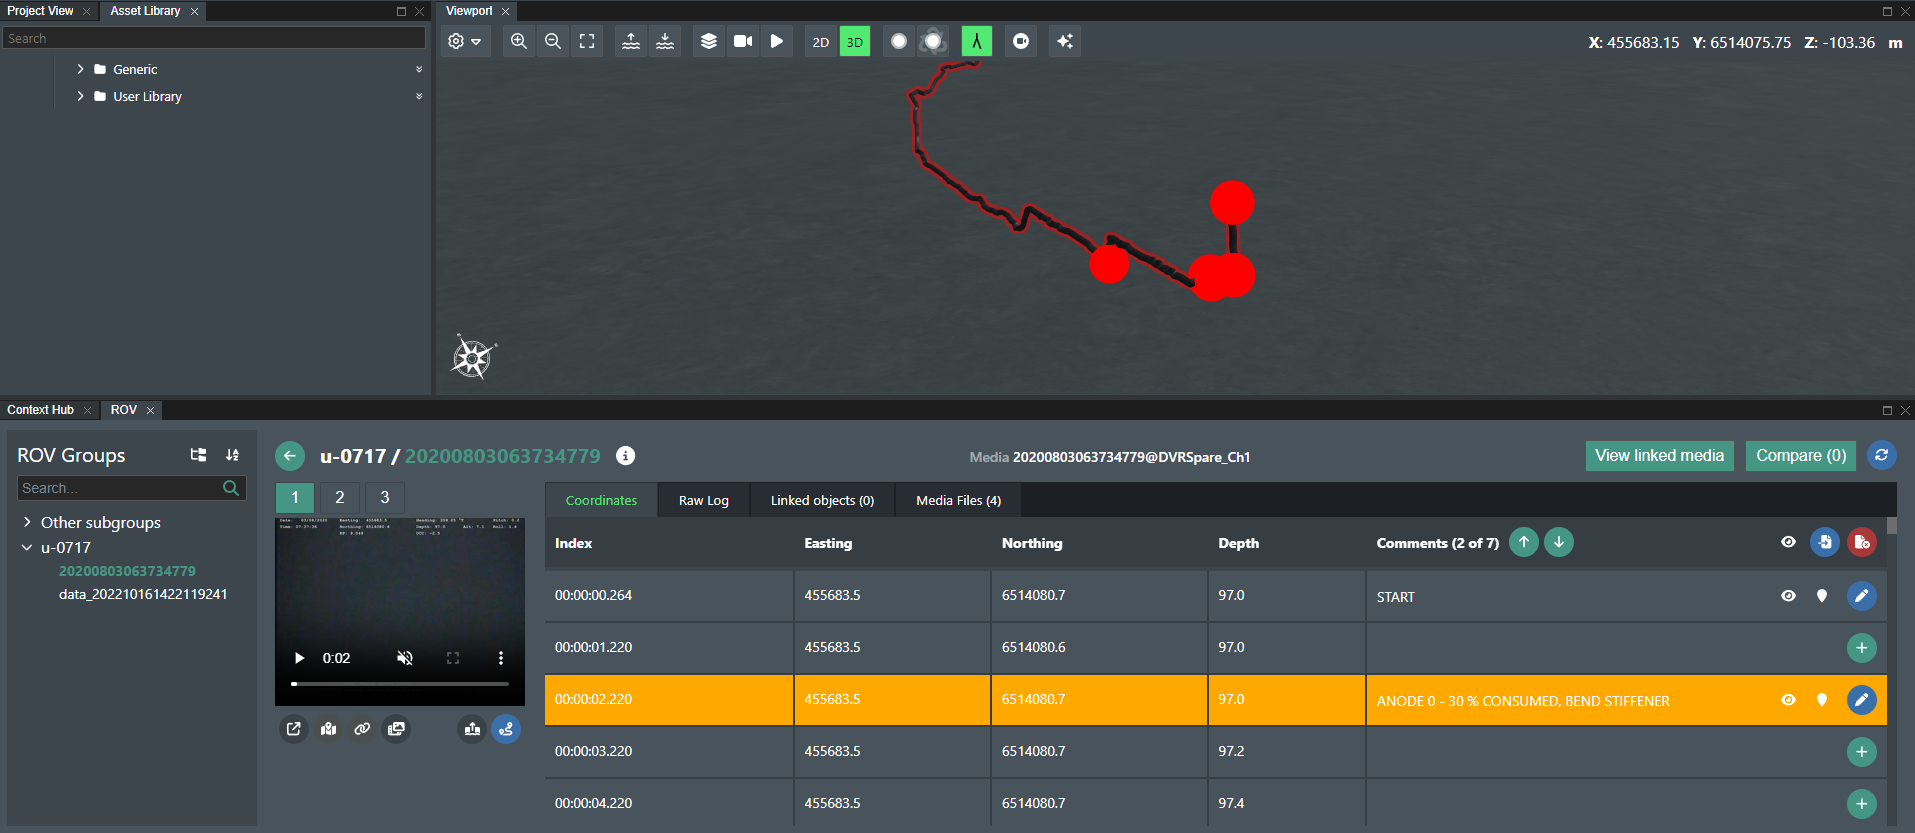
This is how the virtual ROV and ROV path look like. The ROV is moved to its coordinate position for each index of the video.
Media Tabs
There are four tabs for each video.

In the "Coordinates" tab you can find the processed CSV coordinates or the automatically generated ones. They include the video index, easting, northing, depth and comments.
The current video index is marked in orange color and it changes every second if the video is running.
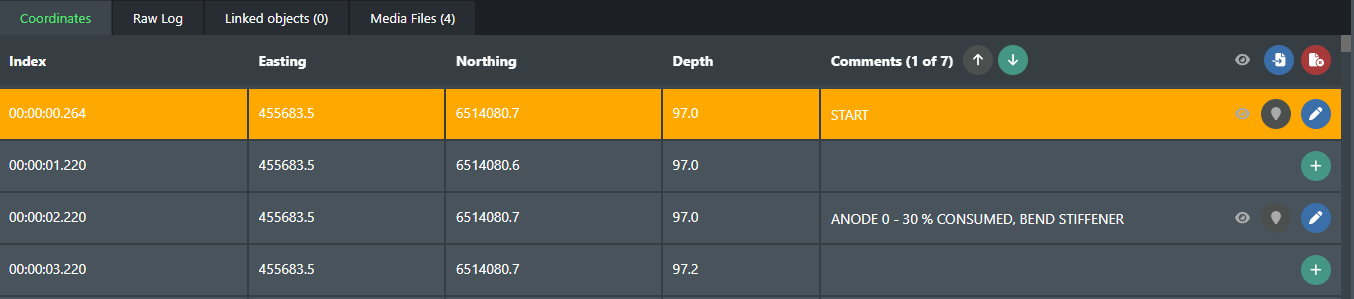
On the right side of the Comments column is the current comment number and the total amount of comments for these coordinates, together with buttons to move to the next and previous comments.

 move to the previous comment.
 move to the next comment.
To the right is the menu for managing the comments.
 toggle the visibility of all comments for the current video inside the viewport.
 import comments from an Excel file.
 remove all of the comments for the current video.
There are two options for adding comments.
- Import from an Excel file.
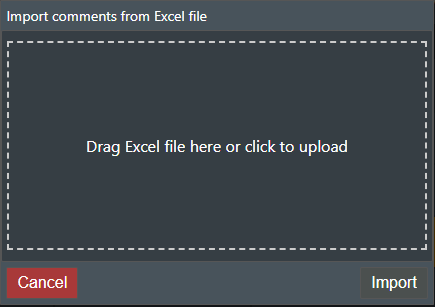
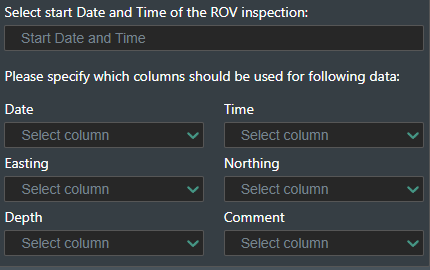
Drop your Excel file on it and wait a few seconds for it to be uploaded and processed. A new screen will be shown, asking you to select from which sheet to import the comments and which index is the header row of the table.
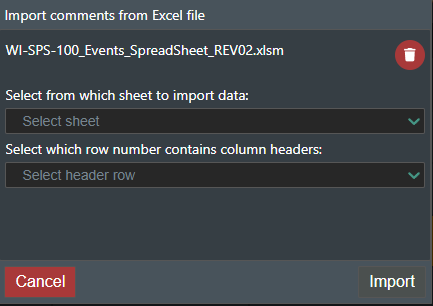
If the table doesn't contain all necessary columns, you will be asked to pick a column to map each missing one. If index column isn't found, you will be asked to specify the start date and time of the inspection. Note that even the seconds are important in order to match the comments to the current coordinate index.
All missing columns will be saved for future use and you won't be asked to fill them again if your Excel table doesn't change. After all of the columns have been verified, the "Import" button will activate and you can click it to finalize the comments import.
You will see all of the imported comments in the visualization by default. Using the eye icon next to the import icon will toggle the visibility of all of the comments for the current video.
- Manual, by by clicking on the icon for the desired index.

Enter the comment text in the newly opened input field and click the ![]() icon to save the comment or
icon to save the comment or ![]() icon to cancel.
icon to cancel.
After saving, the comment will be created and you will see the icons at the end change.

- toggle the visibility of the comment inside the viewport.
 locate the comment inside the viewport.
- edit the comment.

If the comment is visible, a red sphere will be shown on its location inside the viewport. Clicking on any of the comment spheres along the ROV path will make the current video and coordinates jump to this location.
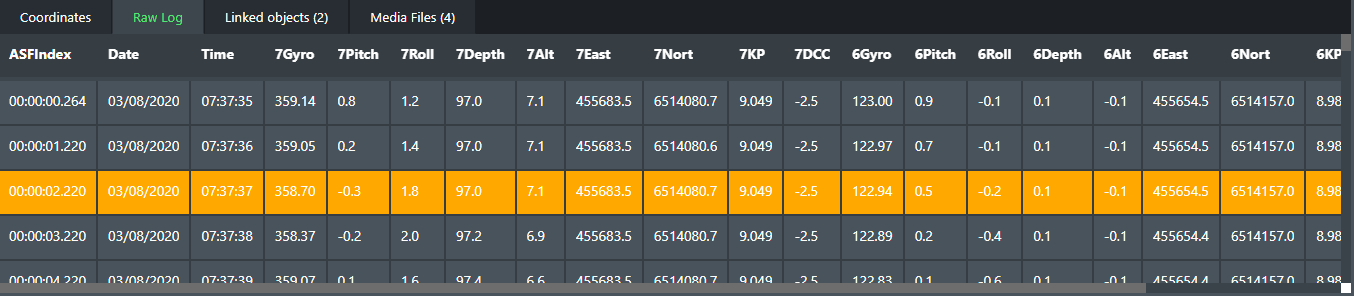
In the "Raw log" tab you can find a table with all of the columns from the unprocessed CSV file. It highlights the current video index in orange color just like the coordinates tab.
In the "Linked objects" tab you can see all of the linked objects to the current video, locate them and unlink them.

- locate the linked object.
 unlink the object from the current video.
In the "Media files" tab you can see all of the processed video and coordinates files for the whole subgroup. Available is the file name, when it was created and updated, and an option to download it.

Top view menu
In the top view menu, you can see an option to go back to the main group, the main group's name, the current subgroup's name and info icon, which shows detailed information about the subgroup on mouse hover. In the middle is the information about the current media, which changes when you choose another camera.

At the right side, you can find buttons to view the linked media, enter compare view or refresh the current media files.
Linked media
There are two tabs inside - "Current selection" and "Current viewport".
- Current selection When you select an object in the viewport that is linked to any of the available videos, you will see the linked videos appear on the screen.
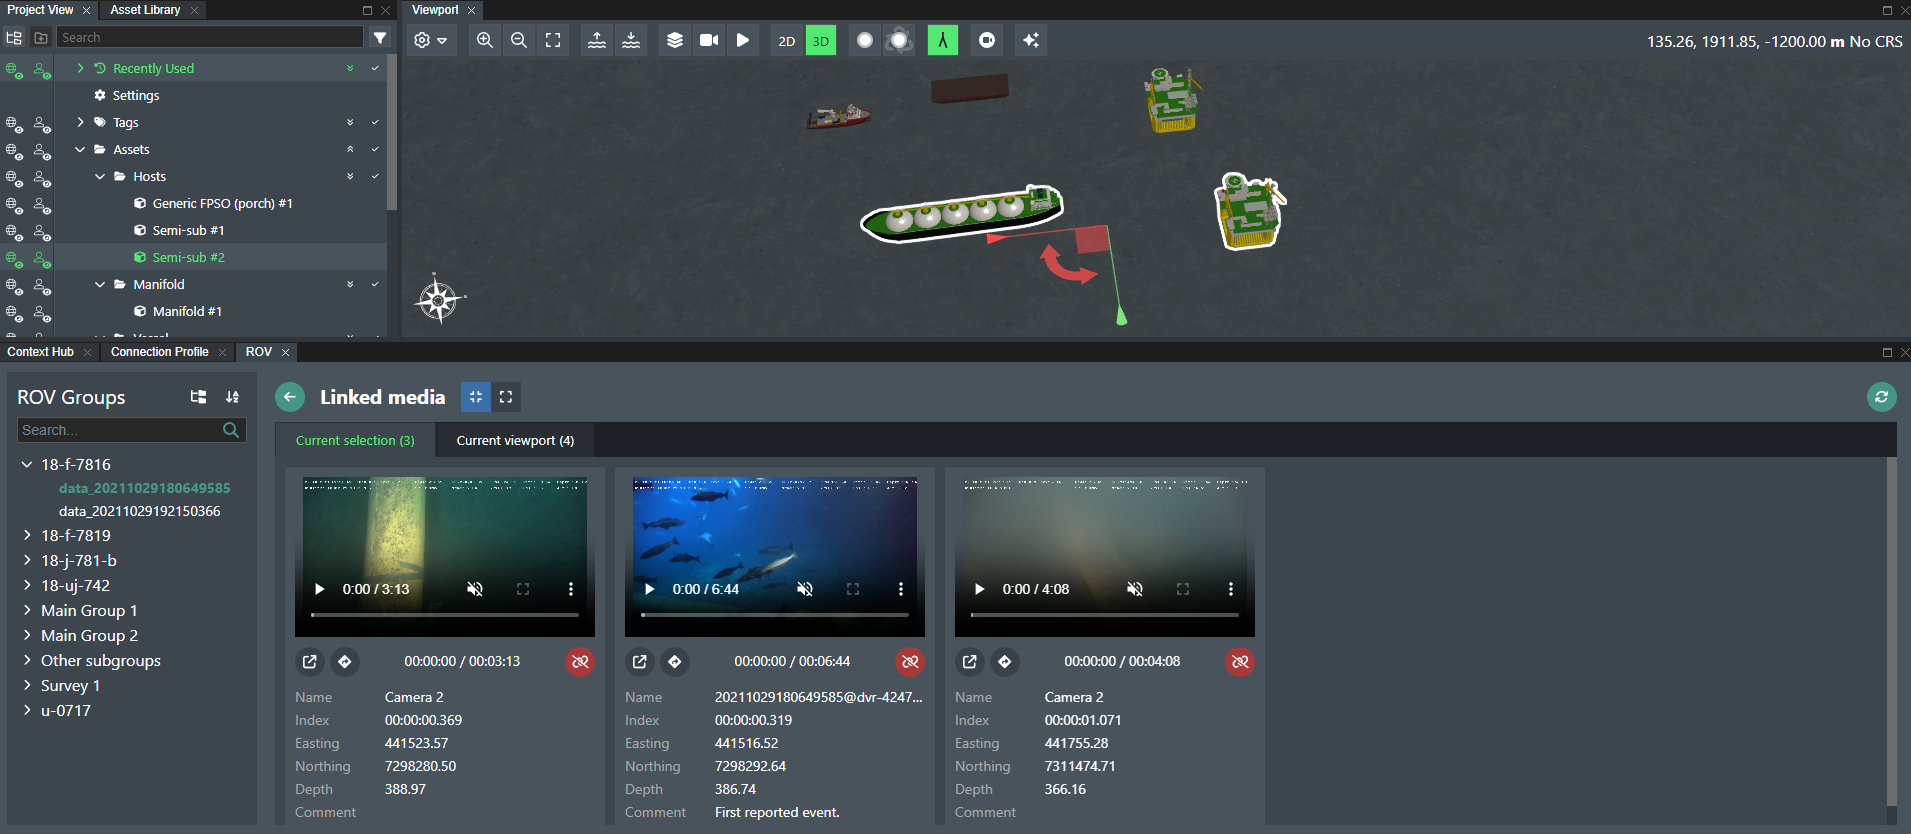
Underneath each video player, there are options to:
- enable or disable the Picture in Picture mode.
 go to the subgroup containing the linked media.
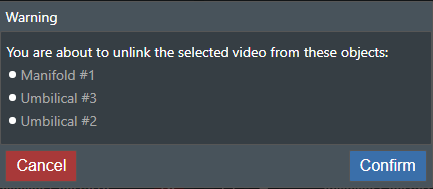
 unlink the media from the linked objects.
Upon trying to unlink, a confirmation popup will appear.
Switching between these buttons enlarges and shrinks the video size.

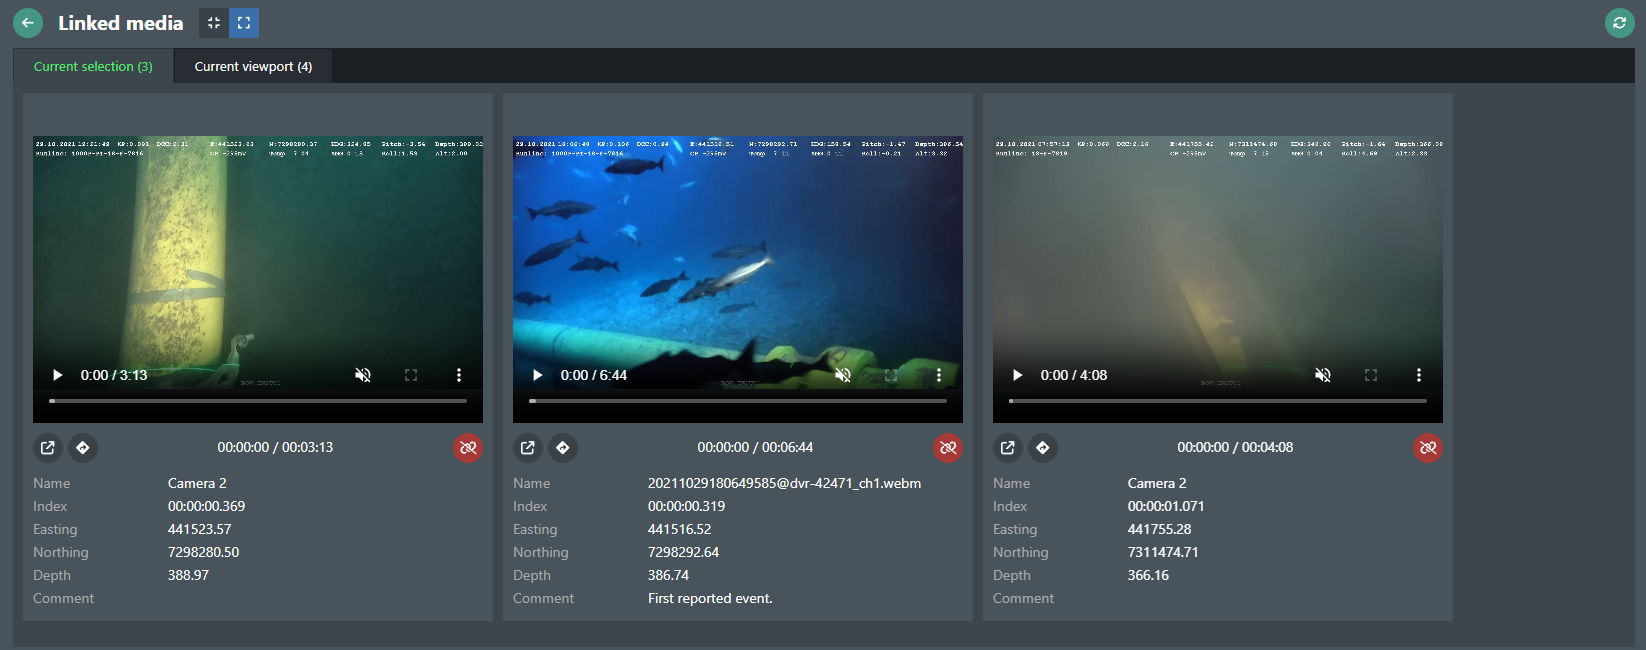
- Current viewport Shows all of the linked videos to all objects that fit within the current viewport.
If you have moved the current viewport after opening this view, you will have to click on the ![]() icon in to top right corner to refresh the data and see the updated result.
icon in to top right corner to refresh the data and see the updated result.
Compare view
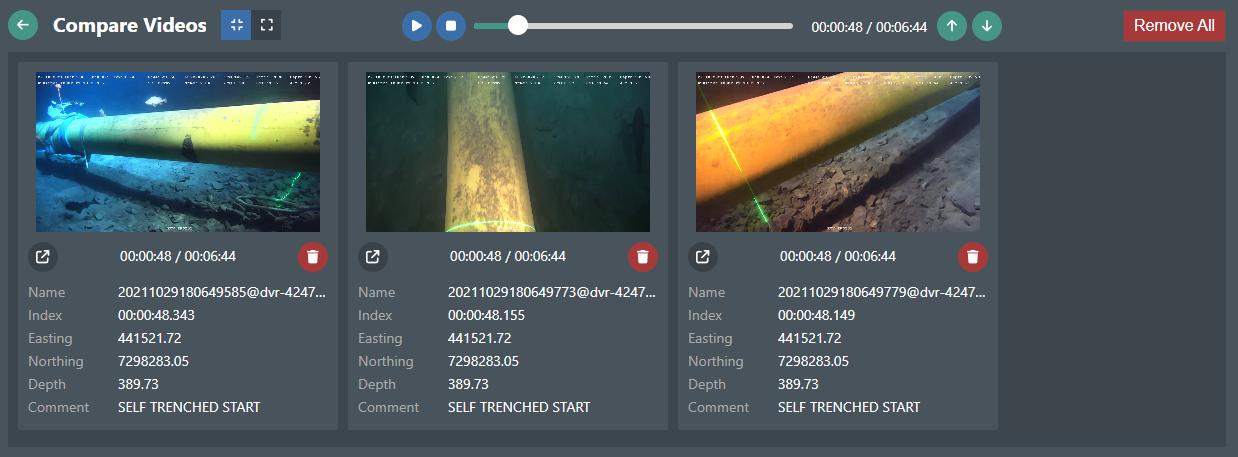
At the top, you will see a synchronized player, where you can play, pause and stop all of the selected videos at once, and also jump to the next and previous comment from all videos.

 play all videos.
 pause all videos.
 stop all videos.
- move to the previous comment.
- move to the next comment.
For each video, you can see information about their name, current index, easting, northing, depth and comment. If the videos are playing, these current properties will update every second, allowing you to not only compare the pure videos, but also the comments for each index.
Underneath each video are icons for toggling PiP mode and removing the video from the comparison.
- enable or disable the Picture in Picture mode.
- remove the video from the comparison.
At the top right corner is the "Remove All" button, which will empty the comparison list.